|
|
|
Kto jest w sklepie?
Sklep przegląda 5833 gości |
|
Kategorie
|
|
Informacje
|
|
Polecamy
|
|
|
 |
|
|
Dla tego produktu nie napisano jeszcze recenzji!
 ;
Wszystko w porządku.
Instrukcja czytelna i kompletna.
Dziękuję.
all right!
thank you.
;
Bardzo dobra instrukcja. Zawiera wszystko co potrzeba, polecam!
 ;
Instrukcja jest OK. Schematy czytelne, opisane niektóre procedury.
;
Instrukcja bardzo czytelna. zawiera co potrzeba. Polecam
;
...instrukcja serwisowa w pełni czytelna i kompletna. Dziękuję!
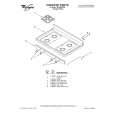
Prepare the battery pack
Insert the battery into the handset and charge first before you start using your phone.
Additional tasks
To Switch to another call* ("call waiting" service) Do this Press (FLASH). Press the button again to get back to the first caller.
1
2
1Slide open the battery compartment lid of the handset. 2Connect (black and red cords). with correct the battery connector porality 3Insert the battery pack, and close the lid. 4Place the handset on the base unit.
Black Red
* You need to subscribe to this service from your telephone company. Notes � Do not cover the microphone during the conversation; otherwise, the other party cannot hear your voice. � If you hear beeps during the conversation, move closer to the base unit; otherwise, the call will be disconnected after 15 seconds. Note that, however, you may not hear beeps if it�s noisy on the handset.
If interference occurs on the handset
When you press (TALK), the handset automatically searches for the channel with the best reception. However, if you notice interference during a conversation, move closer to the base unit. If interference persists, press (CHANNEL) to switch to another channel to improve the sound quality of your telephone conversation.
Note If you hear five short beeps when you press (CHANNEL), move closer to the base unit.
3
The CHARGE lamp lights up when the handset is properly seated on the charge terminals of the base unit. Charge the battery pack for more than 12 hours so that the battery is fully charged. The CHARGE lamp remains lit even after charging is completed.
Battery duration
A fully charged battery pack lasts for about: � 12 hours when you use the handset continuously � 14 days when the handset is standing by.
Notes � The battery pack will gradually discharge over a long period of time, even if not in use. � The battery works best when charged every two or three days. For best performance, do not return the handset to the base unit after every call. If the battery runs out completely, the speed dial numbers and the digital security code will be erased. If this happens, charge it on the base unit for over 12 hours. Then reprogram the speed dial numbers, and assign a CHARGE lamp new digital security code (see �Resetting the digital security code�). You may need to charge the battery several times before it is recharged to its full capacity.
If the handset battery becomes weak during a call
The handset will beep every three seconds with the TALK/BATT LOW lamp flashing at the same time. Finish your call and charge the battery pack.
Caution If this occurs, you cannot use the handset without charging it for more than 1 minutes.
4
Redialing
1 2
Press (TALK), and wait until the TALK/BATT LOW lamp lights up. Press (REDIAL/PAUSE) to redial the number last dialed.
Note If the number exceeds 32 digits, the beeps will alert you that the number can�t be dialed.
To erase the last phone number dialed
Press (REDIAL/PAUSE) twice. The number will be erased from the memory, and you�ll hear a long confirmation beep.
When to purchase a new battery pack
If the battery lasts only a few minutes even after 12 hours of charging, the usable life of the battery has expired and needs replacement. Contact your local Sony authorized dealer or service center, and ask for Sony BP-T16 rechargeable battery pack.
Speed dialing
You can dial with a touch of a few keys by storing a phone number on a dialing key.
Making and receiving calls
Making calls
Storing phone numbers
1 Pick up the handset from the base
unit.
1 Press (PGM).
The TALK/BATT LOW lamp flashes.
2 Press (TALK), and wait until the
TALK/BATT LOW lamp lights up.
(FLASH)
2 Press (SPEEDÂ DIAL).
The dialing keys light up (SPP-Q120
The dialing keys light up (SPP-Q120 only). You then hear a dial tone. If you hear beeps, move closer to the base unit.
TALK/BATT LOW lamp
3 Press one of the dialing keys ((0) to
(9)) to store a phone number on. You hear a confirmation beep.
only).
TONE(*) (REDIAL/PAUSE) (CHANNEL) Microphone
3 Dial the phone number. 4 When you're done talking, press
(OFF). The TALK/BATT LOW lamp goes off.
Do this Press TONE (*) after you�re connected. The line will remain in tone dialing until disconnected.
4 Enter the phone number you want to
TALK/BATT LOW Lamp
store. You can enter up to 16 digits, including a tone and a pause, each of which is counted as one digit.
(REDIAL/PAUSE)
5 Press (PGM).
You hear a long confirmation beep, and the number is stored. The TALK/ BATT LOW lamp goes off.
Additional tasks
To Switch to tone dialing temporarily
Receiving calls
1 When you hear the phone ring;
� Press (TALK) (or any key except (OFF)). or � Pick up the handset from the base unit when the handset is placed on the base unit. The TALK/BATT LOW lamp lights up.
Note Do not allow more than 20 seconds to elapse between each step of the procedure. Tips � If you enter a wrong number, press (PGM), then start from the beginning. � You can attach the supplied directory on the handset. � You can�t receive calls while you�re storing numbers.
To store a number to be dialed via Private Branch Exchange (PBX)
Before entering a phone number in Step 4, do as follows:
2 When(OFF). done talking, replace the handset on the base unit or you�re press
The TALK/BATT LOW lamp goes off.
1 2
Enter the outside line access digit (e.g., 9). Press (REDIAL/PAUSE).
|
|
|
> |
|