|
|
|
Kto jest w sklepie?
Sklep przegląda 6013 gości |
|
Kategorie
|
|
Informacje
|
|
Polecamy
|
|
|
 |
|
|
Dla tego produktu nie napisano jeszcze recenzji!
2-3-7.
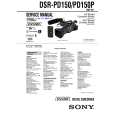
Curl Checking and Adjustment � If the curl is large or there are clearances If the TG3 curl is large or clearances exist, replace the coaster (S) assembly. If the TG6 curl is large, or clearances exist, replace the coaster (T) assembly. If curls or clearances exist on the TG7, rotate TG7 and adjust its height.
Note: Be careful not to rotate TG7 excessively. For details on how to replace the coaster (S) / (T) assembly, refer to 2-2-13 on page 5-48.
� Checking / adjusting method Run the tracking tape (J-20) (exclusive) in the CUE mode or REV mode, and check that the tape runs along each flange. Also check that there are no large curls on each tape guide.
There should be no large curls on the upper flange of TG3 and TG6. TG1 TG2 TG3 TG4 Drum TG5 TG6 TG7 There should be no large curls on the upper and lower flanges of TG7. TG3 TG4 Coaster (S) assembly TG5 TG6 Capstan Use a mirror (J-15) for checking for TG7. Easy to check with removing the damper assembly. (Refer to 2-2-3. Damper Assembly on page 5-41.)
TG2
Drum Coaster (T) assembly
TG1
TG7
2-3-8.
CUE / REV Check
2-3-9.
Rising Check
� Checking method Run the tracking tape (J-20) in the CUE mode or REV mode, and check that the intervals of the waveform peaks are consistent.
CUE mode
� Checking method Check that when the tracking tape (J-20) is switched from the STOP, CUE, REV, FF, REW modes to the PLAYBACK mode, the waveform rises horizontally within 2 seconds. Perform this 2 or 3 times.
Mode changes
STOP CUE REV PLAYBACK PLAYBACK
When switching the modes,
PLAYBACK the waveform should rise
within 2 seconds 2 or 3 times.
REV mode
FF REW
PLAYBACK PLAYBACK
� Check after checking rising � Check that the tape loads and unloads smoothly. � Play a self-recorded or already recorded tape, and check that the sound and images are normal.
� If not even If the waveform peaks are not even, perform "Tracking adjustment" again.
5-55
|
|
|
> |
|